

My beautiful Nina James turned four years old two Sundays ago. This amazing little girl of ours has grown and developed so much over the last few years and I can’t believe just how much she changes all the time. It’s like I fall more and more in love every day with both my kids, which is probably one of the best things about being a parent.
This year for her birthday we arranged to have a party in our garden. A party that came complete with loads of cake, balloons, sweets, jumping castles and more. We decided to do everything ourselves and seeing as I’m working with Gumtree throughout the year to bring you guys some tips on how to get financially savvy when it comes to parenting, I thought I’d share some of my party tricks with you guys in case you’re looking for things like foolproof recipes for yummy homemade cakes that you can jazz up or down, depending on how creative you’re feeling. I’m also going to share a couple of tips on where you can find affordable decor and party goodies.


I bet when most people think about a kids party their immediate thought is “Well how much can a kid’s party really cost?!”. Well just because they’re half the size of us doesn’t necessarily mean you’ll be spending half the amount on a shindig, in fact, you are likely to end up spending more on sweets/food, activities, decor and of course let us not forget the party packs.
When planning a kid’s party one of the most important elements, and it might be because I’m obsessed with cake, is the cake table. I love mine to be overflowing with things that will tempt anyone and everyone to get stuck in. But if you’re not prepared to make some, or most of the stuff yourself then it can land up being really pricey! So below I’m going to share two recipes for cakes that I love and think will make any table worth a few tuck-ins on the day 🙂
Another thing that can set you back quite a bit, especially if you’re looking on the wrong site or in the wrong shop are the party decorations.
And then who can forget the jumping castle, I mean every kid’s party needs one! It’s like a giant over-zealous babysitter that knows just how to keep ALL the kids happy at the same time. These too can be pretty costly, but again if you’re looking in the right place you will always find the right price. I found numerous providers on Gumtree, but here’s one that hit the mark price wise, we’re talking starting price R350, which has a nice ring to it right? Plus, with some of these places if you’re booking the jumping castle for a Saturday or a Sunday will bring it to you on a Friday and only collect on Monday, which means fun times all of the time over the whole weekend!

There are also all sorts of places on their site that you can peruse for party decor and kid’s entertainment and the best part is you’ll find people who can literally supply you with one unicorn balloon and within one click you will find someone who can provide you with an actual unicorn! Another great source for party decorations is good old China Mart which is chock-a-block full of all sorts of balloons, streamers, pin-wheels, confetti, cups, plates, toys, slime and more. PS: If anyone is looking for the Oh-So-Pinteresty gold and silver letter and number foil balloons, in small, medium and large then head straight on over.

Party packs are another thing that can set you back quite a bit depending on how savvy you are. All kids love sweets, so the easiest way to take care of that is to buy stuff in bulk, from places like Westpack or Makro. They have a really nice variety of fun, colourful goodies that will make all kids happy, parents probably not so much haha. Unless you’re like me and dip into your kid’s party packs. Or if you’re feeling up to for the challenge why not make a colourful chocolate chip cookie for each pack, which is fun to do and something you could involve your kids in. You can also make some other fun elements for the inside, like playdough, which can be whipped up in just a few easy steps. This recipe can also be found below.
If you’re also thinking about setting up an arts and crafts corner, which is a really nice idea to keep the kids occupied, Westpack has a great selection of bits and pieces you can buy to make up the table. We attended a party a little while back that had a treasure chest making table. So there were wooden and paper boxes and then all sorts of jewels, animal stickers, glitter and more. Kept all the kids busy for ages and it was a nice take home afterwards too.
Kid’s parties are meant to be fun on the day and hopefully super fun setting up for too. I hope some of these tips/recipes will come in handy for your next one.


Ingredients for Nina’s birthday chocolate and caramel cake: *If you want to make a tower cake like the one above all you have to do is make half this recipe again for the smaller cake. I used the full recipe and two standard 22cm cake tins for the base and one 16cm cake tin and half the recipe for the smaller piece on top 🙂
- 2 cups flour
- 1/2 cup cocoa
- 2 cups sugar
- pinch of salt
- 2 eggs
- 1/2 cup buttermilk
- 1 tsp bicarb of soda
- 1 cup water
- 1/2 cup oil
- 125 grams butter, melted and cooled
- 1 tin of Caramel Treat
Instructions:
1. Preheat the oven to 180°
2. Place all these ingredients in a large bowl and mix with an electric mixer or in a Kitchen Aid. During the mixing process, you must stop and scrap down the sides and bottom of the bowl before you mix again.
3. Separate the mixture evenly into 2 prepared cake tins (I just use greaseproof paper at the bottom and Spray and Cook around the sides). Bake for ±35 minutes or until a toothpick inserted into the middle comes out clean.
4. Let the cake cool in the tins a bit before tipping them out. Allow to cool completely before assembling.
Ingredients for the marshmallow Icing:
- 1 1/2 cups white sugar
- 1/2 cup water
- 3 large egg whites
- 1/4 tsp cream of tartar
- 1 tsp vanilla extract
Instructions:
- In a stovetop-safe glass bowl over the top of a pot of boiling water (fill the pot 1/3 of the way up) combine sugar, water, egg whites, and cream of tartar then with an electric mixer start beating the mixture on a medium speed for no less than seven minutes and no more than 9 minutes or until soft peaks occur.
- Remove from heat and add vanilla extract and then beat for a further 2 to 3 minutes.
- You can make this marshmallow icing any colour you want. Just squeeze a drop or two of any gel colourant into the bowl and give it a good mix.
- To assemble the cake I placed one big layer down on a cake stand and filled the middle with about half of the Caramel Treat. I then placed the second big layer on top of that and then iced the sides and top it with the marshamllow frosting.
- I then placed more Caramel Treat onto the bottom of the smaller cake and placed it on top of and in the middle of my iced cake. I then proceeded to ice the smaller piece in marshmallow frosting. I touched up the sides as I went along.
- I also decorated the top with a mix of sprinkles and cake toppers that I made myself.
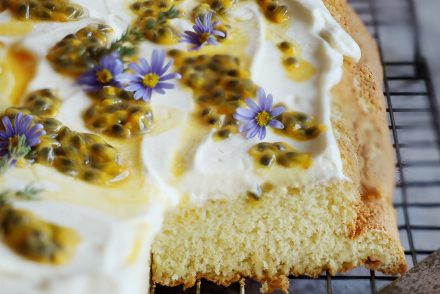
If you’d like the recipe for the Banana Boston Cream Cake in these photos then just click here. This cake will also not disappoint. I guarantee it! This cake is made up of layers of soft banana sponge which is filled with homemade vanilla custard and covered in smooth and rich chocolate ganache.
Happy baking!
Play dough recipe:
Playdough ingredients:
- 2 cups flour
- 3/4 cup salt
- 4 teaspoons cream of tarter
- 2 cups lukewarm water
- 2 Tablespoons of vegetable oil (coconut oil works too)
- Food coloring, optional
- Quart sized bags
- Stir together the flour, salt and cream of tartar in a large pot.
- Next, add the water and oil. If you’re only making one colour, add in the colour now as well. Cook over medium heat, stirring constantly.
- Continue stirring until the dough has thickened and begins to form into a ball. Remove from heat and then place it onto wax paper.
- Allow to cool slightly and then knead until smooth.
- If you’re adding colours after, divide the dough into balls (for how many colours you want) and then add the dough into the quart sized bags. Start with about 5 drops of colour and add more to brighten it. Knead the dough, while inside the bag so it doesn’t stain your hands. Once it’s all mixed together you’re ready to go.
- You can store the play dough inside the bags once done to keep soft. Keeps for up to 3 months.


1 Comment
Hi! Where did you get the star cake toppers from?